
When building applications in Kubernetes, one of the most important challenges is efficiently managing workloads. You want your services to scale up when demand spikes, and scale down (even to zero) when idle, to save resources and reduce costs. This is especially critical in production environments where traffic can be unpredictable.
This is where KEDA (Kubernetes Event-Driven Autoscaling) comes in. KEDA is a lightweight, open-source component that integrates with Kubernetes to provide event-driven autoscaling. Unlike traditional Horizontal Pod Autoscalers (HPAs) that only scale based on CPU or memory usage, KEDA can scale your workloads based on external metrics or events, such as:
- Messages in a queue (Redis, RabbitMQ, Azure Service Bus, etc.)
- Jobs waiting in Kafka topics
- Custom metrics from Prometheus
- Database triggers or cloud events
With KEDA, your applications can react instantly to real-world workloads without over-provisioning resources. It allows you to run microservices cost-effectively while maintaining responsiveness.
What we are building
In this guide, we’ll build a realistic event-driven microservice that processes jobs from a Redis queue. The scenario mirrors what many production systems face:
- A backend service receives tasks (e.g., image processing, notifications, or data ingestion) and pushes them into a Redis queue.
- Worker pods consume tasks from the queue.
- KEDA monitors the queue and scales the number of worker pods up or down depending on the number of pending tasks.
By the end of this guide, you will have:
- A working Minikube cluster with KEDA installed
- A Redis-backed job queue
- A worker deployment that automatically scales according to queue length
- Complete YAML manifests and a test workflow to simulate real production traffic
This project is valuable because it lets you experience a real-world autoscaling scenario. Most production systems have unpredictable workloads, and learning how KEDA responds to events gives you a deep understanding of:
- Event-driven design patterns
- How Kubernetes interacts with external triggers
- Autoscaling strategies beyond CPU/memory metrics
Even if your real application is more complex (with multiple queues or different event sources), this example provides a solid foundation to implement production-ready, cost-efficient, and resilient services.
What you’ll learn:
- Start a 3‑node Minikube cluster (if not started)
- Install Helm (if needed)
- Install KEDA with Helm
- Deploy Redis (simple single‑replica) and a worker Deployment that consumes jobs
- Create a ScaledObject that uses the Redis List scaler
- Create a producer CronJob that pushes items into the Redis list to simulate load
- Observe scaling behavior and clean up
Prerequisites
Make sure you have the following locally installed and working on your machine:
- kubectl (compatible with your Minikube Kubernetes version)
- minikube (we will use it to run a 3‑node local cluster)
- helm (Helm 3)
- docker (or your container runtime used by Minikube driver)
If any of those are missing, install them first. For example on Debian/Ubuntu: sudo snap install kubectl –classic (or use your distro’s package manager). I will not assume any particular OS beyond these tools being available.
Start a 3-node Minikube cluster
# Start minikube with 3 nodes (one control-plane + 2 workers), adjust memory/
CPUs if needed
$ minikube start --nodes=3 --driver=docker --memory=4096 --cpus=2

# Verify nodes come up
$ kubectl get nodes
Notes: –nodes=3 creates 1 control-plane and 2 worker nodes by default. If you already have the cluster running, skip the minikube start step. Make sure kubectl context points to your minikube cluster: kubectl config current-context .
Install Helm
This command will install Helm for you in your local machine. Please, refer to this other post if you wanna learn more about it.
# Add KEDA Helm repo and update
helm repo add kedacore https://kedacore.github.io/charts
helm repo update

# Install KEDA into namespace 'keda'
helm install keda kedacore/keda --namespace keda --create-namespace

# Wait for KEDA pods to become ready
kubectl -n keda get pods
Why Helm? Helm is the easiest official way to install KEDA and its CRDs. KEDA installs CRDs that are required for ScaledObject and ScaledJob resources.
What we’re going to deploy (high level)
- redis-deployment.yaml — a simple Redis single‑pod deployment + service to be able to access it from other pods
- worker-deployment.yaml — a small Python worker Deployment that polls job-queue (a Redis list) and processes items, initially it will have 0 replics since it will imitate a job that doesn’t need to be running always
- producer-cronjob.yaml — a CronJob that pushes messages into Redis periodically to generate load
- scaledobject-redis.yaml — KEDA ScaledObject definition that scales worker based on Redis list length
I’ll explain each file before showing it. All manifests are designed to run in the default namespace for simplicity. You can change namespace fields if you prefer.
Redis Manifest
# redis-deployment.yaml
apiVersion: apps/v1
kind: Deployment
metadata:
  name: redis
  labels:
    app: redis
spec:
  replicas: 1
  selector:
    matchLabels:
      app: redis
  template:
    metadata:
      labels:
        app: redis
    spec:
      containers:
      - name: redis
        image: redis:7.0-alpine
        ports:
        - containerPort: 6379
        resources:
          requests:
            cpu: "100m"
            memory: "128Mi"
          limits:
            cpu: "250m"
            memory: "256Mi"
---
apiVersion: v1
kind: Service
metadata:
  name: redis
  labels:
    app: redis
spec:
  ports:
  - port: 6379
    targetPort: 6379
    protocol: TCP
  selector:
    app: redis
  type: ClusterIP
As we should know already, we are gonna deploy this in our cluster with:
kubectl apply -f redis-deployment.yamlTo be sure the redis service is client, we can test the connectivity with a redis client:
kubectl run -i --tty redis-client --image=redis:7.0-alpine --restart=Never
-- sh
# inside pod shell run: redis-cli -h redis ping
# should reply PONG
Worker code + Deployment
We’ll create a tiny Python worker that continuously polls a Redis list (named job-queue ) with BRPOP and “processes” messages (here, just sleep and echo ). Just to replicate some functionality of reading from Redis. The purpouse of this guide is not the logic of the code itself but it’s realibility on production environments.
In real life your worker would do meaningful job processing.
# worker.py
import time
import os
import redis


REDIS_HOST = os.getenv('REDIS_HOST', 'redis')
REDIS_PORT = int(os.getenv('REDIS_PORT', '6379'))
LIST_NAME = os.getenv('LIST_NAME', 'job-queue')


r = redis.Redis(host=REDIS_HOST, port=REDIS_PORT, decode_responses=True)
print('Worker started, connecting to', REDIS_HOST)


while True:
    try:
        # BRPOP blocks until an item is available
        item = r.brpop(LIST_NAME, timeout=5)
        if item:
            # item is (list_name, value)
            value = item[1]
            print('Processing', value)
            # simulate processing
            time.sleep(2)
            print('Done', value)
        else:
            # nothing to do, sleep to avoid tight loop
            time.sleep(1)
    except Exception as e:
        print('Worker error:', e)
        time.sleep(2)
# Dockerfile.worker
FROM python:3.11-slim
WORKDIR /app
COPY worker.py .
RUN pip install --no-cache-dir redis
CMD ["python","/app/worker.py"]By default if we create the image, it will be in our local registry and Minikube won’t see it. To solve this problem we can enable an addon called registry which will allow us to create a registry in Minikube.
minikube addons enable registryWe need to do a port-forward to forward the data to the registry:
kubectl port-forward -n kube-system service/registry 5000:80And now, in other terminal to not terminate our tunnel, we need to build and push the image so it can be used within the cluster:
docker build -t keda-worker:latest -f Dockerfile.worker .
docker tag keda-worker:latest localhost:5000/keda-worker:latest
docker push localhost:5000/keda-worker:latest
And now we need to create the deployment of our service using the brand new image:
# worker-deployment.yaml
apiVersion: apps/v1
kind: Deployment
metadata:
  name: keda-worker
  labels:
    app: keda-worker
spec:
  replicas: 0 # start with 0 so we can see KEDA scale up from zero
  selector:
    matchLabels:
      app: keda-worker
  template:
    metadata:
      labels:
        app: keda-worker
    spec:
      containers:
      - name: worker
        image: localhost:5000/keda-worker:latest
        imagePullPolicy: Always
        env:
        - name: REDIS_HOST
          value: "redis"
        - name: REDIS_PORT
          value: "6379"
        - name: LIST_NAME
          value: "job-queue"
        resources:
          requests:
            cpu: "50m"
            memory: "64Mi"
          limits:
            cpu: "200m"
            memory: "256Mi"
Please, pay attention that we stated that we want a total of 0 replicas since the design of this is to only run when Keda allows it, saving us computing time and resources in our cluster.
kubectl apply -f worker-deployment.yamlCreate the KEDA ScaledObject for Redis List
Now that we have Redis ready to have message and our service ready to start reading those messages when it’s needed, we need to create a ScaledObject which will tell our service when it’s time to work, create instances and do its job.
# scaledobject-redis.yaml
apiVersion: keda.sh/v1alpha1
kind: ScaledObject
metadata:
  name: keda-worker-scaledobject
  labels:
    app: keda-worker
spec:
  scaleTargetRef:
    name: keda-worker
  pollingInterval: 5 # how often KEDA checks Redis (seconds)
  cooldownPeriod: 30 # how long to wait after scale down before next check
  minReplicaCount: 0
  maxReplicaCount: 10
  triggers:
  - type: redis
    metadata:
      address: "redis.default.svc:6379"
      listName: "job-queue"
      listLength: "5" # scale target: number of items -> triggers scale
      activationListLength: "1" # minimum backlog to activate scaling
Fields explained:
- scaleTargetRef.name — the Deployment the ScaledObject controls (kedaworker).
- pollingInterval — how often KEDA will query Redis.
- minReplicaCount /maxReplicaCount — limits for scaling.
- triggers — an array of trigger definitions. Here we use the redis scaler.
- listLength is the target backlog size that will cause KEDA to adjust replicas (KEDA converts this into HPA metrics internally).
- activationListLength prevents scaling up until backlog is at least that value.
Please, pay special attention at triggers.type since that value is unique for the kind of job we are doing. Keda provides us with an extensive list of different triggers we can use depending on what we want to observe in order to scale our services. You can have a complete list at their official site.
Keda and Redis are on different namespaces on our cluster, when specifying the address make sure you are pointing correctly to Redis. If you don’t use
defaultnamespace as I did, it will be different thanredis.default.svc:6379
kubectl apply -f scaledobject-redis.yamlProducer Cronjon to generate load
Finally, we are going to create a cronjob that will just generate some load to replicate a real user, and will just push a message to redis every minute so we can emulate the whole flow automatically and don’t hit any button neither waiting for an user.
# producer-cronjob.yaml
apiVersion: batch/v1
kind: CronJob
metadata:
  name: job-producer
spec:
  schedule: "*/1 * * * *"
  jobTemplate:
    spec:
      template:
        spec:
          restartPolicy: Never
          containers:
          - name: producer
            image: redis:7.0-alpine
            command: [ "sh", "-c" ]
            args:
            - |
              now=$(date +%s)
              echo "Producing job-$now"
              redis-cli -h redis rpush job-queue job-$now
              sleep 1
kubectl apply -f producer-cronjob.yamlObserve KEDA scaling in action
For this purpose I have splited my terminal into 3 sections, so I can see everything at one glance. First I have to sections of the same size: right and left.
On the right size I will be running the logs of the Scaled Object to see how it’s being triggered everytime it sees there is 1 or more messages in the queue
kubectl logs -f -n keda keda-operator-f948b6c4-ln9chAnd then the left side I will have it splitted into two parts again. In the upper part I will be checking how many messages do I have on the list
watch 'kubectl exec -it deploy/redis -- redis-cli llen job-queue'And at the botton I will be watching the number of pods from my deplotments
watch 'kubectl get deploy'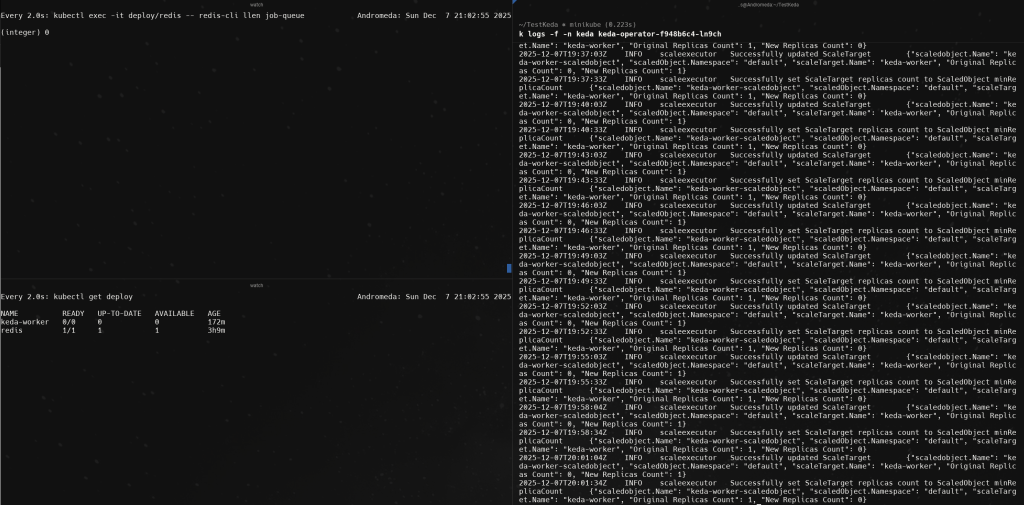
There we will be able to see how every minute the list has a new message, a pod of the worker is being created and the message is deleted. Reading all the logs in the right side.
By this way, we could have a service that only will be running when it’s needed. But also, this can be replicated and configured to just scale up or down services based on some triggers to ensure we are always giving the desired availability and reliability.
Clean up resources
kubectl delete -f producer-cronjob.yaml
kubectl delete -f scaledobject-redis.yaml
kubectl delete -f worker-deployment.yaml
kubectl delete -f redis-deployment.yaml
helm uninstall keda -n keda
kubectl delete namespace keda
You can see and download all the code on GitHub https://github.com/JoaquinJimenezGarcia/LearningKeda